Showing posts with label Eyebrows. Show all posts

Back to School: Change your look for less

Thursday, 20 September 2012

Everyone would sometimes like to chop and change their looks, but make-over's can be time consuming and expensive.  This is especially true if you are going back to school and would like to impress you friends.  So how can you change your look for less (time and money)?!  Easy with these few quick and easy little tips and tricks.  Just give it a try...


The Color Purple

We all know that mascara is the secret to instantly playing up your eyes, but who says it always has to be black? Try painting your lashes blue to spice things up, or if you’re feeling super-daring, go for purple (looks great on hazel eyes) or even green (for brown or blue eyes)!


Just Peachy

Switching up your lip color is an easy way to transition your summer beauty look into fall. This season, orange is the new pink, so trade in your rosy-hued gloss for a subtle peach or coral shade. Or, if you’re a fan of bold lips, try a bright tangerine lipstick for a pop of standout color.


White Out

White eyeliner is the beauty world’s best-kept secret. Take a break from your signature smoky eye and use white eyeliner on the inner corners of your eyes, and along the water line, to make your eyes look instantly bigger and brighter!


Pass the Highlighter

Waking up for school can be rough. Fake a fresh-faced look even if you’ve been up all night cramming for a test by using a shimmery highlighter on your cheekbones. This is a quick way to get a natural girly glow. Tip: Make sure to smile so you can locate the apples of your cheeks, then apply the shimmer in a downward slant right above them,  to create the illusion of higher cheekbones.


All Day Color

Tired of reapplying your lip-gloss after every class? Try out a fun lip stain in a berry or red shade and you’ll be well on your way to the perfect, lasting pout! Stains can last up to 8 hours, while glosses can fade after eating and drinking. To apply it smoothly, line and fill in your lips with a lip liner in a similar color, then apply stain on top with a lip brush.


Best in Brows

When making up your eyes, look beyond just your lids and lashes—eyebrows are actually the feature that frames your whole face, and a little grooming can go an extra-long way! If your brows are on the lighter or thinner side, try filling them in with a powder or pencil that’s a complementary shade to your hair color. For blondes, that’s usually a taupe color; for darker hair, it’s usually a light or dark brunette shade. You'll be surprised at what a world of different this quick trick makes—especially in photos!


Wing Woman

Leave your basic pencils in the classroom and try out liquid eyeliner to liven up your look. Liquid liners or brushes dipped in gel liner glide on much smoother than the kind you have to sharpen, and the result is more pronounced. If you usually stop your line at the end of your eye, tip the liner upward and extend it out into a slight wingtip—this shape is extra flirty and only takes a minute to complete.


 I know that I've written this as a 'back to school' special, however these rules can apply to anyone who'd like to change their looks without forking out mega bucks in the process.

I love the idea of coloured mascara, and can't wait to buy a purple mascara.  It means that I can accentuateeyes and that is always great in my books.

Plus lipgloss/stains are such an EASY way to change your look.  If you stick to nudes, go for a sexy pop of colour.  I'm going to be trying a lot of orange colours.

Let me know your quick fixes to change your look quickly.

xoxo,
Angelique

How to...

Monday, 19 September 2011

...Get Perfect Brows

After receiving my HD Brows Palette, it inspired me to do a post on how to get the perfect brows.  It really doesn't matter how beautifully your makeup is applied onto your face, if your brows are unruly, you will not look as great as you possibly can!


So the question remains, how DO you get those perfect eyebrows?  Firstly, it is a good idea to visit a beauty therapist to shape the brows, however this is not always possible (please check Simply Beautiful's guide on how to do it yourself, down below).  I have my eyebrows done with threading and then just maintain my shape at home with slanted tweezers.  This particular technique works really well for me, but there is also the option of having it shaped with tweezers or waxing.  You will know which technique works best for you.


It is then very important to fill the brow in slightly.  Even if you have thick eyebrows that grow well, there are still very small gaps in between the areas of hair growth.  It is important to fill these areas in, thus creating an optical illusion of the perfect arch and elongation on the brow.  The perfect eyebrow starts above the inside corner of your eye (over the tear duct), and ends at the outside corner, above your eyelashes.  The arch should ideally lie above the iris, the coloured part of your eye.

Ideally use a sharp brow pencil or eyeshadow that is a few shades darker than your own brows, and fill the brow from the rounded front part towards the arch, creating a tented effect at the arch.  Then once the first half of the brow has been formed, move downwards on the brow to elongate the end part of the brow.  Check for symmetry between brows to make sure one is not longer than the other.

It is easier to clear stray hairs with tweezers than to do a big clearup of the brow area at once.  If you do want to pluck your brows by yourself, it is easiest to do this after you have had a shower and the hair follicles have been slightly opened by the steam.  Using slanted tweezers helps with grip on the hair follicle as well.  This process may be painful, so just bear with it.  Having the ideal shape helps, and to DIY the brows just check out how to shape the brow before plucking/waxing.

HD Brows before and after pictures of eyebrows, including women and men!

Now the following brow shaping part has NOT been written by me, I found it at:  http://simplybeautifull.blogspot.com

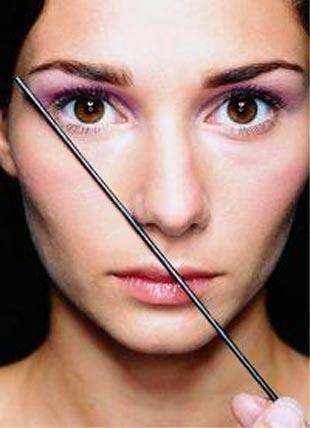
The first thing to do is to determine what your eyebrows should look like. This is done with some help of a ruler or a very long pen, if you have it.

To determine how long your brows should be, hold a ruler parallel to your nose. Level the ruler with the inner corner of the eye, and you’ve found where your brow should begin. Mark the correct point with a dot using a kohl pencil or similar.


The tricky part is the arch, or where the highest point of your brow should be. Avoid creating an unnaturally exaggerated arch; the shape you’re aiming for is thicker at the inner corner, tapering out over the brow bone. The best way to do this is by holding a ruler from the edge of the nostril past the outer edge of the iris (the coloured part of the eye) and up to the eyebrow. Mark the spot with a dot.


‘Connect’ the nostril and the outer corner of your eye with a ruler and you’ll find where your brows should stop. Now link up the dots in a gentle arch to draw the ideal shape of your eyebrow. This will give you a guideline to go by waxing and tweezing.


There are so many great products to help with maintaining and beautifying the brows that there really is no excuses.  Especially with so many celebrities making such an effort to keep their brows in tip top condition. 


Happy shaping!  


Quick Tip

Monday, 8 August 2011

Ever thought of how big a waste it is to throw away your old mascara's?  Well, here is a quick tip to revive it.  And NO ... not spitting into it, that is just EUW! 

If you'd love an eyebrow mousse to keep your mad eyebrows under control and in a lovely shape, how about washing your old mascara brush thoroughly with soapy water.  Then dipping the brush in vaseline, smoothing your eyebrows into shape.  This will secure your brows for the rest of the day, whilst also helping with the shape of the brow and any straggler hairs.

Hope this is a good tip.  Have you got any tips to share or ideas?  Let me know!
 
FREE BLOGGER TEMPLATE BY DESIGNER BLOGS