After receiving my HD Brows Palette, it inspired me to do a post on how to get the perfect brows. It really doesn't matter how beautifully your makeup is applied onto your face, if your brows are unruly, you will not look as great as you possibly can!

So the question remains, how DO you get those perfect eyebrows? Firstly, it is a good idea to visit a beauty therapist to shape the brows, however this is not always possible (please check Simply Beautiful's guide on how to do it yourself, down below). I have my eyebrows done with threading and then just maintain my shape at home with slanted tweezers. This particular technique works really well for me, but there is also the option of having it shaped with tweezers or waxing. You will know which technique works best for you.

It is then very important to fill the brow in slightly. Even if you have thick eyebrows that grow well, there are still very small gaps in between the areas of hair growth. It is important to fill these areas in, thus creating an optical illusion of the perfect arch and elongation on the brow. The perfect eyebrow starts above the inside corner of your eye (over the tear duct), and ends at the outside corner, above your eyelashes. The arch should ideally lie above the iris, the coloured part of your eye.
Ideally use a sharp brow pencil or eyeshadow that is a few shades darker than your own brows, and fill the brow from the rounded front part towards the arch, creating a tented effect at the arch. Then once the first half of the brow has been formed, move downwards on the brow to elongate the end part of the brow. Check for symmetry between brows to make sure one is not longer than the other.
It is easier to clear stray hairs with tweezers than to do a big clearup of the brow area at once. If you do want to pluck your brows by yourself, it is easiest to do this after you have had a shower and the hair follicles have been slightly opened by the steam. Using slanted tweezers helps with grip on the hair follicle as well. This process may be painful, so just bear with it. Having the ideal shape helps, and to DIY the brows just check out how to shape the brow before plucking/waxing.

Now the following brow shaping part has NOT been written by me, I found it at: http://simplybeautifull.blogspot.com
The first thing to do is to determine what your eyebrows should look like. This is done with some help of a ruler or a very long pen, if you have it.
 To determine how long your brows should be, hold a ruler parallel to your nose. Level the ruler with the inner corner of the eye, and you’ve found where your brow should begin. Mark the correct point with a dot using a kohl pencil or similar.

The tricky part is the arch, or where the highest point of your brow should be. Avoid creating an unnaturally exaggerated arch; the shape you’re aiming for is thicker at the inner corner, tapering out over the brow bone. The best way to do this is by holding a ruler from the edge of the nostril past the outer edge of the iris (the coloured part of the eye) and up to the eyebrow. Mark the spot with a dot.
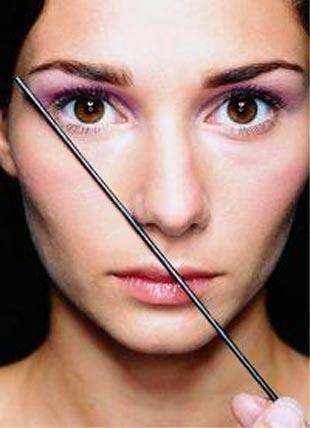
‘Connect’ the nostril and the outer corner of your eye with a ruler and you’ll find where your brows should stop. Now link up the dots in a gentle arch to draw the ideal shape of your eyebrow. This will give you a guideline to go by waxing and tweezing.
There are so many great products to help with maintaining and beautifying the brows that there really is no excuses. Especially with so many celebrities making such an effort to keep their brows in tip top condition.
Happy shaping!


