DIY Makeup and Fragrance Storage

Friday, 30 March 2012

Good morning all you beauties!

Today is the very last day of my DIY-marathon to sort out everything from your jewellery to your beauty goodies!  It is time to sort out and declutter in time for summer or if you are in the southern hemisphere:  Winter!

I've got a treat in store for you, as today I'm looking at storing your makeup brushes.  On tuesday, I discussed the 7 essential makeup brushes that you need to do all your makeup with and how to keep them clean, if you've missed this post just click here.

Coffee Bean Brush Holder

This simple project keeps your makeup brushes upright and organized. Plus, your bedroom will smell like coffee every morning. Yum.

What You Need:• small, clear plastic tub (one side should be open)
• coffee beans/ small grains, etc.

Instructions: 1. Take the clear tub, and fill with coffee beans and/ or small grains (whichever you prefer)
2. Stick your brushes into the coffee beans, brush side up.


Nail Polish Spice Rack

It's a shame that nail polishes spend most of their time in a drawer. With such vibrant colors and unique bottle shapes, they should be on display. Here's a cute way to do just that (plus, it'll make finding your favorite red that much easier):

What You Need:• spice rack
• paint

Instructions: 1. Paint the spice rack a fun color.
2. When dry, arrange your nail polishes on the rack.


Perfume Plate Rack

Perfume bottles are super pretty, but displaying too many on your dresser can end up looking like clutter. Here's a better way to organize and show off your fragrance collection:

What You Need:• plate rack/spice rack
• paint
• picture-hanging hooks

Instructions:
1. Find a small plate/spice rack, and paint it a fun color.
2. Once dry, attach it to your wall with picture-hanging hooks. Arrange your perfumes and/or makeup bottles in rack.


Kitchen Props Repurposed

With a little imagination, you can repurpose any accessory for another area in your home -- even if it wasn't made for that spot in the first place. Here's how to create a hair tool station out of an Ikea kitchen product:

What You Need:• Philips head screwdriver
• Ikea's Fintorp rail
• Ikea's Fintorp hooks
• Ikea's Asker container

Instructions:
1. Attach the Fintorp Rail to your wall, using the instructions provided by Ikea. During this process you will also slide on the hooks.
2. Hang the Asker container(s) from the hooks, and leave a few hooks free for your larger hair tools.
3. Use the container(s) for your hair elastics, bobby pins, or other hair accessories. Use the additional hooks to hang your curling iron, flat iron, and other hair tools. (You may need to attach a loop to the end of your hair tools so they can hang on the hook, if it doesn't come with one already.)


And that is it!  If you haven't organized yourself out of all these ideas, nothing will!  I've given you ideas for your jewellery, hair tools, perfumes, makeup, and even your makeup brushes!  I hope that you've enjoyed this as much as I have!

Have a wonderful weekend!  :)


DIY Ideas for Jewellery Storage

Thursday, 29 March 2012

So we all have hundreds of pieces of jewellery, and I've already filled up both my jewellery boxes!  But now it is time to start organizing.  There are some really great, easy ways of making your jewellery easy to access and also easy to store.  The 'Wooden Necklace Organizer' is amazingly simple to make and makes sure that your necklaces will ALWAYS be tangle-free and easy to get to.  I'm fed up of always detangling my lovely long necklaces.  So this seems the easiest way ever to sort it! 

And how about all those earrings you have?  Especially the dangly ones.  If you have an old cheese grater lying around, why not put it to good use?  This is a very simple way of ensuring that you can keep your earrings together and easily see what is on offer each morning before work or school.  This is a time-saving device in my belief. 


Wooden Necklace Organizer

Salvaged wood is a hip and eco-friendly way to decorate. Here's how to bring that element into your room, and organize your necklaces at the same time:

What You Need:
• salvaged wooden board
• small drawer knobs (with screws)
• drill


Instructions:

1. Take your piece of salvaged board and drill five pilot holes down the center of the board, the same distance apart. (Tip: You may want to mark them out before you drill.)
2. Take your drawer knobs and attach them to the board, via the pilot holes.
3. Hang up the board, and arrange your necklaces on the drawer pulls.


Earring Cheese Grater

Here's a secret: Your cheese grater doesn't want to grate cheese. What it really wants to do is show off your earrings. Give it a chance.

What You Need:

• small cheese grater
• paint
• small metal hooks (used to hang pictures)
• four beads (the hooks should fit inside the bead holes)
• strong glue
• tape

Instructions:

1. Paint the cheese grater a fun color.
2. Once dry, attach the four hooks, one to each corner of the bottom of the cheese grater using the strong glue. Place a piece of tape over the hook to hold it in place until the glue is dry.
3. Once the glue has dried, remove the tape, and put the bead on the curved part of the hook. This will protect the surface of your furniture.
4. Hang earrings from all the different holes in the cheese grater.


I hope you've enjoyed the jewellery storing DIY post, and have found it helpful.  Tomorrow is my last post on DIY storage ideas, and then we'll be back onto the topic of beauty!  :) Have a wonderful day!

Declutter DIY: Part One

Wednesday, 28 March 2012

"Can you try and clear off the kitchen table?" my husband asks for the eighth time this week. I look over at the mess -- five nail polishes, a bag of cotton balls, three mascaras, six lip balms, a curling iron, a can of hairspray, and two bottles of shower gel. Oh, and four fashion magazines.

OK. I'm woman enough to admit it: I have a beauty clutter problem. But it comes with the job. And while I love testing the latest beauty products, they unfortunately don't just disappear into thin air after I use them. They need to go somewhere. Right now, somewhere seems to be the kitchen table, which means hubby and I spend most nights eating dinner on our laps. So not ideal.

I would love to de-clutter, but whenever I think of organization, I imagine clear plastic bins with labels attached. I guess that works, but it's just so boring ... and ugly. Besides, some beauty products are actually fun to look at, like perfume bottles and colorful eyeshadow palettes. Why hide them in a drawer or in a bin under the bed?

But with my husband threatening to move out, I decide it's time to tackle this clutter problem. Luckily, there's a bunch of crafty people on the web who know a thing or two about stylish organization, whether it's for makeup, accessories, or hair tools. If I get started now, I think I might have the kitchen table cleaned up in an afternoon -- or, alright, more like a week. Ready to join me?

Over the following week, I'll be looking at some amazing decluttering methods and how to make it look great.  This is DIY-101.

Magnetic Makeup Board

Is your makeup strewn all across your bathroom counter? Do you spend 30 minutes digging in your vanity drawer for your favorite blush? If so, you'll love this magnetic makeup board. Not only does it keep your makeup organized, but it also looks super cute on your wall.

What You Need:
• old picture frame
• acrylic paint
• spray adhesive
• metal sheet or baking sheet
• piece of fabric
• mini magnets
• strong glue
• old, empty pill bottles

Instructions:
1. Find an old frame, and remove the glass. Paint the frame a fun color.
2. Take the frame to the local hardware store and ask them to cut a piece of metal to fit inside the frame, or use an old baking/cookie sheet if it already fits.
3. Cut a piece of fabric to the size of the metal sheet, and attach it to the metal sheet with some spray adhesive.
4. After the spray adhesive has dried, attach the metal sheet to the frame.
5. Line up all your makeup products -- blushes, bronzers, eyeshadows -- and attach a mini magnet to each item. Use a heavy duty glue to attach the magnets.
6. Take an old pill bottle and throw away the top. Paint the bottle. Once dry, attach a few magnets to one side of the bottle. Fill the old pill bottle with brushes, eyeliners, or mascaras.
7. Place each makeup product on the sheet, as well as the old pill bottle.

Stay tuned because tomorrow I'll be looking at decluttering your jewellery in style and a whole host of cute ideas to keep stuff tidy.


7 Makeup Brush Essentials

Tuesday, 27 March 2012

Most artists will admit that they are nothing without the tools of their trade. Just think: Where would Van Gogh have gotten without his bold brush strokes?

I'm not saying that your face should end up looking anything like "Starry Night," but when it comes to good makeup application, the makeup brushes you choose make a big difference.

So, this means it's time for you to leave the finger painting to the kids and graduate past relying on the foam wands included in many eyeshadow compacts.

Investing in and using the right makeup brushes and tools will not only help give you a flawless makeup look, but you'll actually save money in the long run. How? Well, put simply, you'll use less product and your makeup will last longer (i.e. remain germ-free longer), if you keep your hands out of your colors and formulas.

But with a gazillion different shapes and materials of brushes, it can be difficult to know which ones you actually need and which should be left in a makeup artist's case. You definitely don't need to tote around an arsenal of brushes in every shape and size known to womankind in order to achieve a gorgeous makeup look.

In fact, you only need seven, according to MAC Senior Artist Louise Zizzo and Landy Dean, makeup artist and brow expert at the Marie Robinson salon. Here I'll explain which tools are totally necessary and how to use and care for them.


Step 1: Choose the brush material

When choosing your makeup brushes, it's important to factor in the material the brushes are made of. The makeup formulas you use will help you determine whether to choose natural, real hair (i.e. sable or pony fibers) or synthetic, fake hair usually made of acrylic or plastic.

Natural brushes are better for dry products like blush and eyeshadow and synthetic brushes are best suited for cream or liquid products like concealer or foundation because they soak up less product than natural hair.


Step 2: Choose the brush size and firmness

So you know what material you want, and now it's time to find a brush that feels good on your face. Makeup brushes are pricey, but are a worthwhile investment that can last a long time, so choose brushes that are comfortable on your face and non-irritating.

To find the right brush, Size definitely matters. You should take note of … how it fits the area of the face in which you are using it, such as the eye area or cheek area. The bristles should not be too rough or stiff and should have some flexibility to give with the contours of the face and eyes.

Once you've worked that out, take note of how the brush feels in your hand. It should feel natural and easy to maneuver, which is key for precise application and blending.

Step 3: Select the various brushes you need

Foundation brush

The brush: A round, fluffy and flat-tipped synthetic brush. Try something like the MAC 130 Short Duo Fibre Brush.

Why you need it: This type of brush is amazing for blending and buffing foundation on to the skin. The shape is perfect for a smooth application and will really work to cover pores for a flawless finish.

How to use it: It is best used by dipping the brush into foundation and buffing it on to skin using a circular motion. Start on the cheeks and blend back towards the hairline.


Powder brush

The brush: A soft, round, large natural brush. Try something like the Mally Natural Hair Powder Brush.

Why you need it: This is a must-have brush for dusting powder on the face. You will use less product than with a puff and it gives a more even, natural-looking finish.

How to use it: Dip [your] brush in powder and tap off excess, [then] using a sweeping motion, brush lightly over skin following the natural contours of the face.


Blush/bronzer brush

The brush: A soft, medium-sized dome-shaped natural brush. Try something like Avon Ergonomic Blush Brush.

Why you need it: A blush brush that is ultra soft and has long bristles, so as not to disturb foundation or irritate the skin, is ideal for giving color and life to the cheeks.

How to use it: Use the brush to sweep blush and bronzer upwards onto the cheekbones -- from the apple of the cheek up towards the ear.


Eyeshadow brush

The brush: A small, stiff, flat natural brush. Try like the Sonia Kashuk Tools Eye Shadow Brush.

Why you need it: This is the brush you need to apply allover eyeshadow color, as it will give your lids a smooth finish and more intense pigment than a fluffier brush would.

How to use it: Sweep shadow over the lids from the inside of the eye, outwards.


Eyeshadow blending brush

The brush: A flower-shaped, soft natural brush. Try something like the MAC 224 Tapered Blending Brush.

Why you need it: This is the ultimate blending brush for eyes, as it can really get into the crease of your eye and define your lid with precision.

How to use it: Dip the tip of the brush into [your] eyeshadow using a circular motion and then tap off the excess [product]. Then, just using the tip of the brush, start on the outer edge of the eye crease and blend backwards and forwards through the crease using a windshield wiper action. This will contour your eye and work to give you a smoky eye look.


Eyeliner/brow brush

The brush: A small angled natural or synthetic brush. Try something like the Eco Tools Bamboo Angled Eyeliner Brush.

Why you need it: It's multi-purpose as it can be used on your lashline for eyeliner and your brow to fill it in. Plus it is the most user-friendly of the eyeliner brushes due to its easy-to-maneuver slanted angle.

How to use it: To apply liner, placing the brush on the inner corner of the eye and pressing into the lashline, "walking" the brush across to create a perfect line. Also create "a winged edge," by simply pulling out slightly past the edge of the eye. For the eyebrows, use it to fill in sparse brows with powder, by using short strokes over your natural brow shape.


Lip brush

The brush: A small, flat, round-tipped brush. Try something like Mary Kay Retractable Lip Brush.

Why you need it: It's the best-shaped brush for a defined lip and will make a precise lip color application easy.

How to use it: After lining lips, cover [the] brush with lipstick then starting at the center of the lips blend out to edges. Using the tip of the brush, define [the] edges by using short precise strokes to blend liner and lipstick together.


How to clean your brushes

Now that you've purchased your perfect set of brushes, it's time to learn how to protect your investment by keeping them germ- and bacteria-free. Do this by cleaning, sanitizing and properly drying them regularly. Here's how:

Use a brush cleaner once a week (try Colorescience/Mac Brush Cleaning Spray). Spray it onto a Kleenex and sweep the brush back and forth to remove the makeup.
For a deeper clean, wash your brushes with shampoo. Add a drop of shampoo to a cup half full of warm water. Swirl the brushes around and then thoroughly rinse. Then let them dry flat [on a towel], because if they dry upright, the water will drain into the metal casing and break down the glue causing bristle loss.

So with all that said, you now know the best pieces of kit to stock up on when it comes to makeup brushes and cleaners.  Hope you've enjoyed this post and found it helpful.


Avon Skin So Soft - Soft & Fresh Dry Oil Body Spray

Monday, 26 March 2012

Good morning all you stunning girls!

I hope you all enjoyed your weekends and had an amazing time!  I've been catching up on all the YouTube videos that I've missed recently, and just generally relaxing and taking it easy.  The only negative is that the weekend flew by and now I'm back at work and missing the time off!

I'm very glad though because I'll be going to some motorbike auctions on friday, so it's a four day week for me!  And we've also got the long-looong weekend to look forward to over easter!

PLUS did you SEE the sunshine this weekend?  It was fabulous and so nice to not feel cold.

That takes me on to holidays.  A lot of people are in the midst of going on their holidays, and often to places where there are mosquitoes.  My good friend Yolandie, just came back from holiday and mentioned that she had had a harsh time with mosquitos (on holiday in Kwazulu Natal in South Africa) and I thought I'd let you know one of my failsafes to stop mozzie bites.  If you'd like to have a look at her blog (which is really wonderful, just click here).


Features:

  • Our special formula oil in a convenient spray
  • Use after a bath or shower to lock in moisture
  • Non-greasy and quickly absorbed
  • A light spray leaves skin silky smooth
  • Perfect for your holidays - slip it into your suitcase to stay soft
  • 150ml.
Retails at approximately £6.49 per 150ml bottle but lasts for ages!

Someone in my family told me about this magical spray.  Something in the spray stops mosquitoes from biting you and it hydrates your skin at the same time.  I've actually put this to the test in the dreaded mosquitoe areas of Kwazulu Natal, and found mozzies to stay well away.  This meant I had NO mozzie bites at the end of my holiday.

Have you got any great tips on keeping nasty buggies away from you over your holidays?  A fail-safe way of staying bite free?  Please share your remedies :)

Have a wonderful, productive day!

Outfit for the Weekend: Relaxed Pastels

Friday, 23 March 2012

Hello gorgeous girlies!

It is nearly the weekend, in T-minus 7.5 hours we will all be free from work, school and other duties to allow for a free and fun weekend!  I'm so excited for tonite because I don't have to do the Insanity workout (which is sooo hard) and it is my day off!

Depending what you are getting up to over the weekend is also dependant on what you will wear. So I've thought about some gorgeous looks that will look fabulous over this weekend and whittled it down to one!

As you might have guessed by the title of the blog...it is all about the Pastels!  I'm just in LOVE with this look and hope you will like it too.


Sweater by ACNE (similar found here), Blouse (Similar found here), Jeans by 7 For All Mankind (Similar found here), Bag by Miu Miu, Loafers from ASOS MACABEE, Bunting necklace by ASOS and POP Nail Polish (similar found here)
  I hope you've enjoyed having a sneaky peak at this look and love it as much as I do.  If you have any other alternatives, I'd love it if you could share your thoughts :)

Have an awesome weekend filled with lots of fun!

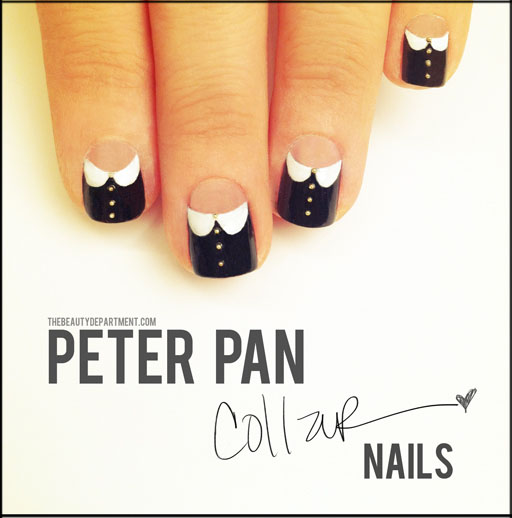
Peter Pan Collar Nails

Thursday, 22 March 2012

Photos + Post by Kristin Ess

How cute do these Peter Pan Collar Nails look?  I'm definitely going to pop this look onto my nails to perk up my thursday morning dreariness.  I found this tutorial on The Beauty Department, and thought that I would share it asap!  All people in the fashion world are currently obsessed with the peter pan collar, and I am no different. 


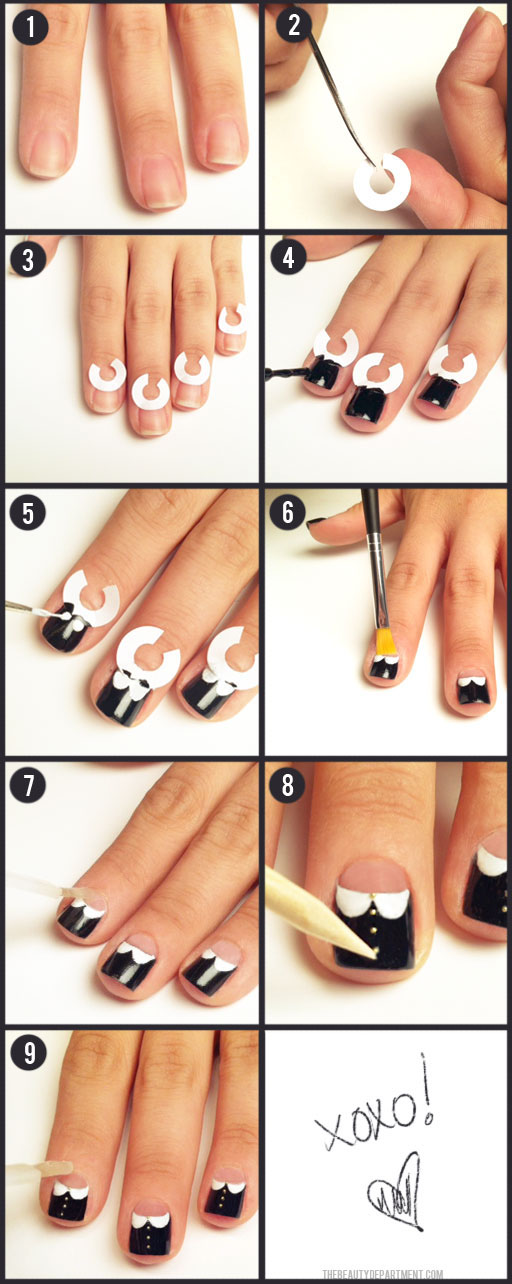
Steps:
  1. Start with clean nails– no polish, no base coat.
  2. Cut binder paper ring stickers so they’re more flexible.
  3. Apply to each finger to get the neckline shape.
  4. Apply one or two coats of BLACK NAIL POLISH.
  5. Make the collar using WHITE NAIL POLISH. Make 2 dots next to each other to start the collar and then connect it with corners (see above).
  6. Remove the stickers and use a paint brush to clean up the line.
  7. Add a CLEAR COAT to secure the MICRO BEADS.
  8. Use a damp orange stick to pick up the bead and place it on the nail.
  9. After making a row of “buttons” add one last quick drying clear coat to secure the beads.
I hope that you have enjoyed this post as much as I have.  Chin up mateys it is almost the weekend!  Can't wait!

Bobbi Brown SPF15 Tinted Oil Free Moisturizer

Wednesday, 21 March 2012

So here it is!  We are firmly on our way to having a fantastic spring!  I've seen lots and lots of daffodils, so the sunshine can't be too far away now?  I'm so excited for summer, but it also fills me with a bit of dread.

Why you ask?  Well it means that my skincare routine will have to change, and so will my makeup.  And I'm going to have to start working on those extra wobbley bits I've picked up over winter.  So with all that said and done, my top priority is coverage for my face. 


I've recently looked at lots of different products that gives light coverage on your face, like the Garnier B.B. cream and also the Liz Earle Sheer Skin Tint.  Both actually give you far more coverage than you would expect, whilst still being very light and easy-breathing on the skin.

So I'm having a little look at something a bit different today, Bobbi Brown's SPF15 Tinted Oil Free Moisturiser.  Tinted products tend not to give you enough coverage, but it is great for when you are on holiday or your skin only needs a hint of coverage.

Bobbi Brown has already released her Tinted Moisturiser and has decided to look for an oil-free alternative for us ladies that suffer with normal to oily skin, or even the dreaded T-zone! 


Bobbi Brown introduces a fantastic gel-based
formula for normal to oily skin. Inspired by her
award-winning SPF Tinted Moisturiser, this new
SPF 15 Tinted 'oil free' Moisturiser hydrates and protects
skin while offering sheer, natural looking coverage.
Not only is this Tinted Moisturiser light and refreshing, it's
packed with plenty of goodness for the skin too.
Ingredients include Collagen boosting peptides to help
strengthen and firm your skin, antioxidant Vitamins C & E to help protect your skin against free radical damage and
Sodium Hyaluronate, a moisture magnet which instantly
hydrates skin.
All this and available in 7 different shades,
What more could you possibly ask for?
RRP: UK £27.00 / Ireland €36.00
Available on counter now!
Or buy here!

I'm definitely going to be purchasing a full-size of this product.  It is great for giving light coverage during the day, especially when you are in a hotter climate.  The product doesn't smell that great, but does exactly what it says on the tin.  Oiliness is kept at bay, and the colour can be built up for fuller coverage for an evening look.  All reviews have been four stars and more on the Bobbi Brown website.  

Award Winner! Best Tinted Moisturiser & Reader Favourite, ELLE Beauty Awards 2011; Best Base Range, In Style Best Beauty Buys 2011.


Have you tried this tinted moisturiser?  What did you think?


Glitter

Tuesday, 20 March 2012


How many of your fancy faces will be rocking GLITTER tonight?? If you’re planning on it, here are some quick tips & tricks along with some of our favorite glitters, glues + tools. We’ve also listed which stores will have them so you can go in and pick them up last minute…


1. NYX Cosemetics “Glitter Cream Palette” £5.00 River Island, Love Makeup and NYX Online
2. Deborah Lippman nail polish in “Boom Boom Pow” £18 House of Fraser, Nordstrom
3. OPI Muppets Collection in “Rainbow Collection” £10.80 Ebay and all good nail shops
4. Sephora Collection Glitter Eyeliner  Sephora
5. Sephora silicone glitter applicator brush Sephora
6. Makeup Forever Glitter Pots £10. Make up For ever Online
7. Makeup Forever Eye Seal £15 Make up For ever Online
8. TooFaced Glitter Glue £16.50 Amazon
9. Urban Decay “Heavy Metal Collection” £13 Ebay, Debenhams, and online
10. NARS “Super Orgasm” blush £21 Nars Online, Selfridges


BEST TIPS + TRICKS:
  • If you choose silver, gold or opalescent glitter, you can wear almost any shade of lipstick with it (red, vamp, fuchsia, nude).
  • If you choose colored glitter (blue, green, purple, red), you’ll want to pair it with a nude lip as you’re already making a strong statement with your eyes.
  • Use a longwear cream eyeshadow (like the NYX palettes above) or use a glitter glue as your base so the glitter can adhere.
  • Don’t apply under eye concealer or foundation until after you finish your glitter shadow. That way the glitter won’t have anything to stick to if it falls.
  • For bigger glitter chunks, you can individually place pieces using lash glue.
  • Use a piece of paper or a business card and place it underneath your eye to catch the glitter that falls off as you apply (or) apply extra face powder underneath your eye just before applying the glitter so you can easily swipe off the excess that falls below your eye using a powder brush and nothing will stick to your makeup.
  • WASH OFF YOUR MAKEUP WHEN YOU GET HOME.
  • Soak glitter glue with warm water.
  • Gently go in with a makeup towelette afterward to clear off any remaining pieces of glitter so they don’t get stuck in your pores!
Cheers! Have fun and sparkle responsibly!

Insanity Workout

Monday, 19 March 2012

So there I was at work when my friend finally prodded me into doing something pretty crazy:  The Insanity Workout!  I'd been harping on about it to him for ages, and he started with the fit test.  Clearly I had to start too.

The fit test didn't go well!  I was knackered by the warm up ...but pushed through nonetheless.  It might not be the best results, but I'd finally started!  By day two, getting into the actual workout, I struggled...but I'm pushing through.  The only problem is, I can't walk now :D hahaha so unfit!

What is Insanity 60 Day Workout? 

INSANITY Workout is a 60-day cardio-based total-body conditioning program that’s perhaps the most intense workout ever put on DVD. Fitness expert Shaun T drew on his collegiate track and field training plus his subsequent years of experience as an elite trainer to create a program that takes total-body conditioning to an extreme level.


Look at the results!

Abs in 60 days!

The full DVD set of workouts
The trainer Shaun T. who is both amazing and evil :)
 I'm so excited to see the results.  This workout is not for the feint of heart, and will push you to the limits.  I'm really enjoying rediscovering a few muscles that I've misplaced since school!  If you really want to push and see results, you could definitely expect to see that happen with this workout.


Have you recently embarked on a new fitness regime?  Let me know which one it is!  :)


Happy Mothers Day!

L'Oreal False Lash Telescopic Mascara

Friday, 16 March 2012

Good morning all you gorgeous ladies! 

IT IS ALMOST THE WEEKEND!  wheeeee SO, happy about that!  Can't wait to just chill and take it easy this weekend.

I haven't got specific plans, but I'm definitely going to catch a couple of movies.

Today, I'm reviewing L'Oreal's False Lash Telescopic Mascara, which features Cheryl Cole.  Now just to get this out the way, I'm not a fan of Cheryl...but the mascara is the main focus.


Cheryl applying the mascara to her own lashes without any falsies.


The rubber brush is voluminous to create a great base to cover all the lashes

Lovely packaging that would look lovely on any dressing table


Comparing the packing with the brush, which is on a long stalk

The spidery lash look that you can achieve with this mascara

False Lash Telescopic Mascara


I think that mascara's can be so hit and miss.  The two biggest players in mascara are L'Oreal and Maybelline and each brand has it firm fans.  I've tried various mascaras in the Maybelline range and find them to be hit and miss at times.  But L'Oreal has certainly cracked the market with their 'Telescopic' range.  Some people really LOVE these mascara's whilst others aren't always sure.  But one thing is true - you get length and volume in one stroke with this beauty.
The brush on this mascara is rubber and has a pointed end that bulges out slightly at the end.  This is basically to allow for all lashes to be covered in as few a strokes as possible.  It is easy to hurt your eyes with these brushes at times, especially if they scratch them.  So I find these brushes difficult to use at times, and prefer the more traditional brushes.

Spiky-ness aside I do like this mascara- the size of the brush gives you lots of control meaning it is quick and easy to apply. The colour is very black like I expect from all my mascaras and the final look is volumised, thick lashes.  This mascara does clump together to give a spidery-lash look, but if you like this sort of look, you'll LOVE this mascara.
I'd definitely repurchase this baby and can't wait to wear it out!
Have you tried it?  What do you think?
Hope you have a happy, fun weekend! 
xoxo,
Angelique
 
FREE BLOGGER TEMPLATE BY DESIGNER BLOGS